When I presented the Penguin Cake at a Birthday Party, there was a six year old boy, Nicolas, at the party, who’s face lit up when he saw the penguin. Later that evening, Nicolas told me that it was his 7th Birthday in December, and asked me if I would make him a Cheetah for his birthday.
I knew that this was going to be a challenge. But, I love a good challenge!
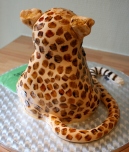
Here it is! What do you think?
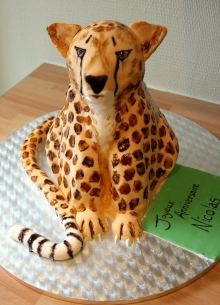 When Nicolas came to collect the cake, he had the biggest smile on his face! It gave me so much joy to see his face, and proud to know, that for many years to come, he will remember the Cheetah Birthday Cake!
Instructions:
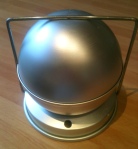
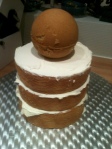
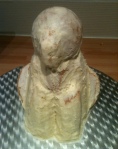
1. Bake 3 9inch vanilla sponge cakes, and one round cake. I was fortunate to have this contraption, which is used for making Christmas Puddings, but I am sure another small cake would do, in which you carve out a head.
 2. Allow the cakes to cool completely. Cut the tops off the cakes, to make the top even. Layer the cakes, one on top of the other, with Butter Icing between the layers. Start with the largest, and work your way to the smallest cake on top.
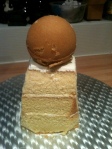
 3. Cut around the sides, to start to get a body shape.
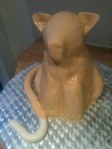
 4. Start to form the rest of the body. Using Butter Icing, stick on two ends of the cakes, as the hunches of the leg. Then stick on more ends of cakes, as the legs, and a little bit on the face as the muzzle. Cover the whole cake with Butter Icing, and leave to dry completely.
 6. Using Ivory colouring (I used Wilton Ivory Icing Colour), colour 1 kg of icing until it is a caramel colour. Using a measuring tape, measure from the bottom of the back of the cake, over the top, to the bottom of the front of the cake, and the same for the bottom of the left hand side, to the bottom of the right hand side. This will give you the desired length and width of the icing you need to roll out. Both the length and width of my icing was 53 cm. Dust your worksurface with cornflour (it is silkier, and smoother than Icing Sugar), and roll out the icing until the desired length and width, ensuring that you maintain a thickness of about 4mm.
7. Lightly brush the cake with warm water, to help stick the icing to the cake.Scoop your arms under the icing sugar, and place the middle of the icing sugar over the head of your moulded shape. Gently press down the sides, to cover the whole shape, and cut of the remainder. If some of the icing tears, do not worry, use a little more water to mould it back together.
8. Using the scraps of the icing sugar, knead them back together. To create the tail, tear off a part of icing from the ball of scraps, and roll it into a long sausage. To stick it on, using a knife, score the back of the tail, and the area where you want to stick it. Then lightly rub some water into the areas, and stick the shapes together at these areas.
9. To create the ears, tear off another small piece from the ball of scraps. Mix some Tyro Powder into the piece of icing – this will help the ears go hard. Divide the piece of icing into two, and roll them into balls. Using the palm of your hand, lightly press them down, and then using your finger and fore thumb of both hands, cup around the edges of the ball, to create a triangle shape. Turn the triangle over, and using your thumbs, press into the centre. Using toothpicks, stick the ears onto the head. (At this point it was looking a little like a pig with a long tail!)
 10. To create the paws, tear off another small piece from the ball of scraps. Divide the piece of icing into two, and roll them into balls. Using the palm of your hand, lightly press them down. Using a sharp knife, slice half way up the circle 3 times to create 4 fingers. Stick these into place, in the same way as the tail.
11. To create the claws, take a bit of white fondant icing, and shape small cones, and press these onto the ends of the paws.
12. Roll out a small piece of white fondant icing, and press this onto the chest and up the bottom half of the nuzzle. Merge this into the caramel coloured icing, using water.
13. Using Ivory paste, and black paste, using a flathead painting brush, start to paint on the detail. For the spots of the cheetah, use a mixture of the ivory paste and the black paste. For the details on the face, use black.
14. Leave to dry.

Amazing! You are so talented!
That’s amazing! I wouldn’t even know where to begin.
It looks fantastic. I wish I could do something like that.
Thats facsinating i’ve never seen a pictorial of a cake like that being created!
that is unbelievably gorgeous. the King of Cakes here would be green with envy.
This is awesome!! It looks great.
Looks awesome! I’d be pleased with this cake any day 😀
Wow!! I’ve just trawled through your blog and its amazing! Love the sugar roses, I would have no idea where to begin with something like that!
what size is the round ball tin pan you used?
Wow that cake is awesome.
Thank you! It took quite a few hours, but I was really pleased with the result! Thanks for visiting and taking the time to comment. I really appreciate it!